BVC 5 - Dashboard
The BVC 5 admin dashboard is a very useful and highly customizable page that displays
various items defined by the store admin. The store admin can add or delete items
on the dashboard to fit their needs. The items displayed on the dashboard are known
as “Content Blocks”.
Before we move forward, we should discuss these customizable “Content Blocks” and
the columns (“Content Columns”) in which they’re displayed.
Content Blocks
Content Blocks are customizable
elements that you can add or remove from Content Columns. Most Content Blocks contain
performance and presentation options editable by the store admin.
Content Columns
Content Columns are columns
within the store or admin area that contain Content Blocks. The admin dashboard
has 3 Content Columns.
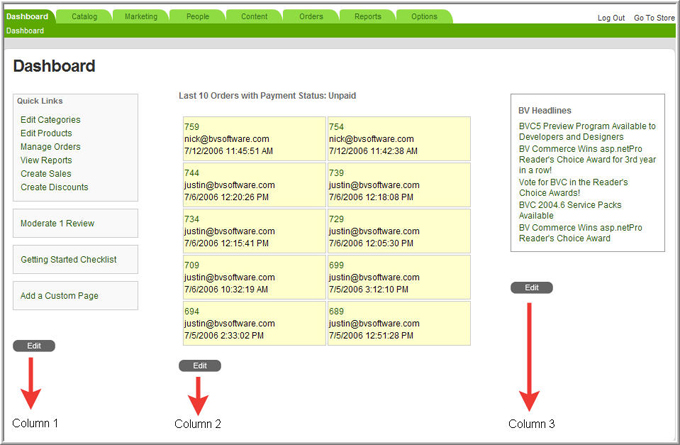
Each Content Column has a corresponding edit button allowing you to add, edit or
remove Content Blocks. Clicking the edit button below each Column takes us to an
Edit Column Page.
|
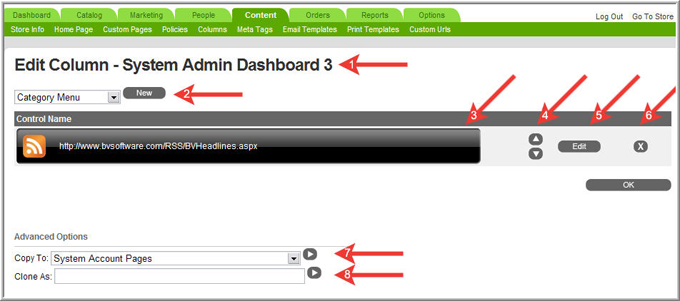
Edit Content Column Page |
|
1 |
Content Column Name: In this example we’re editing “System Admin Dashboard 3”. Let’s
break down this name to further understand it’s meaning:
System - Signifies this column is a “System” generated column and cannot be totally
deleted off the store. However, the content blocks within the column may be deleted.
Admin - The area the column will appear. In this example, this column will appear
in the “admin” and not the store.
Dashboard – Specifies the page this column will appear on.
3 - The column number you’re editing. The admin dashboard contains 3 columns.
|
|
2 |
Content Blocks drop down list: Content Blocks can be added by selecting an item
in the drop down list and clicking the “new” button. This will add the selected
content block to the column. |
|
3 |
Content Block Name: Displays the name of the Content Block. |
|
4 |
Positioning arrows: Allows the store admin to position the Content Block on the
page. Select the up or down arrow to move the block above or below other blocks
in the column.
|
|
5 |
Edit Button: Some Content Blocks have editable options. Select the edit button to
configure its options. |
|
6 |
Delete Button: The delete button removes the item from the Content Column but does
not permanently delete the Content Block. |
|
7 |
Copy To: The “Copy To” feature allows you to copy a Content Column and all of its
Content Blocks to another Content Column in your store or admin. |
|
8 |
Clone As: Similar to the “Copy To” feature, this allows you to clone the Content
Column. Once cloned, the Content Column and all of its blocks will be stored in
the Content > Columns section of the admin. You can then save it for later use or
add it to another Column within the store or admin. |