BVC 5 - Order Manager
The Order Manager will display all store orders from newest to oldest in descending
order. Orders can be filtered by selecting a status in the Payment, Shipping, Status
and Date Range drop down list. Once a filter has been selected, the list of orders
will repopulate automatically.
You can also use a “Keyword” to search through orders.
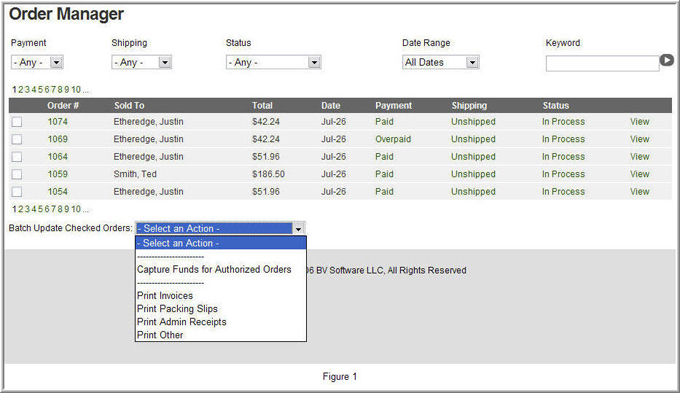
Clicking the order number or the “view” button will allow you to view the order
details. Clicking on one of the statuses (payment, shipping, and status) will take
you to the appropriate screen for that status. Example: If you click the “payment”
status on an order, you will be directed to the page to collect or refund payments.
Clicking on a “shipping” status will take you to page for shipping items.
New order statuses can be created under the Options > Orders section. These new
statuses will automatically show up in the “Status” drop down list. This feature
allows you to add custom statuses to an order that may be specific to your store.
The “batch update” drop down list at the bottom of the Order Manager allows you
to bulk update one or more orders.
Capture Funds for Authorized Orders: If the store is configured
to “pre-authorize” at checkout, this option will capture the funds to complete the
order.
Print Options: Bulk printing allows you to print invoices,
packing slips, admin receipts and many other print templates for orders. Print templates
can be configured under Content > Print Templates.
Order Details
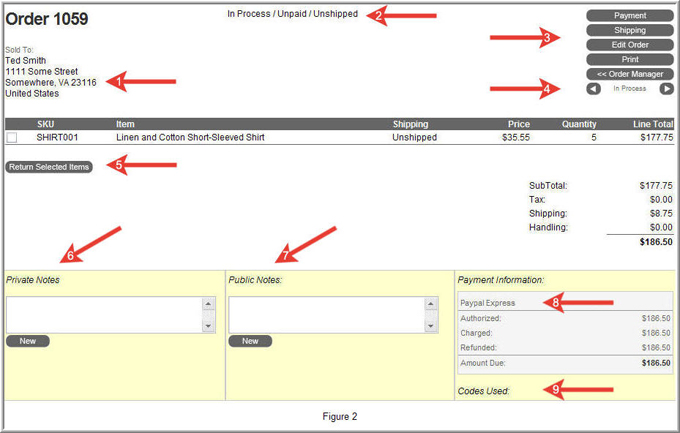
The Order Details page gives the user the ability to view detailed information about
the customers purchase.
|
Order Details |
|
1 |
Displays the customers billing name and address. |
|
2 |
Displays all the statues for the current order. The first status is the “order status”.
New order status codes can be created under Options > Order. The second status is
the “payment status”. The third status is the “shipping status”.
|
|
3 |
Quick links to areas within the admin to collect payment, ship items, edit the order,
and print items. |
|
4 |
Allows you to easily set the “order status”. Use the arrow links to navigate through
all order statuses.
|
|
5 |
Select the checkboxes beside an order and use the “Return Selected Items” button
to move the items into the return manager.
|
|
6 |
Displays and allows the ability to add private notes to the order. Private notes
are only viewable to store admins. All note types can be deleted.
|
|
7 |
Public notes can be added an order and will be viewable to the customer. Customers
can see this note when viewing the order details for an order under the “Your Account”
section of the store.
|
|
8 |
Displays the payment method used by the customer.
|
|
9 |
Displays any promotional codes used during the order.
|
Collecting a Payment

Figure 3 above displays the “Payment” screen. This screen allows you to collect,
refund or void funds for an order. BVC 5 has smart technology that will offer options
based on how the payment was collected.
The example above shows two payment types we’ve added to the order. Each can be
deleted using the “x” delete button. Notice the buttons on each payment type display
an appropriate action (ex: Receive Cash, Authorize/Charge CC). To add a new payment
method to the order, select a method from the drop down list at the bottom of the
screen and click the “new” button.
Shipping an Order
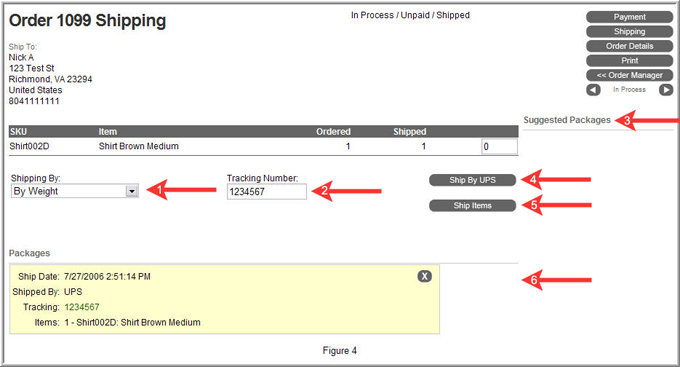
|
Shipping |
|
1 |
Displays a drop down list of all available shipping methods. The customer selected
shipping method will be the default item in the list. |
|
2 |
Enter in the tracking number for the order if applicable. This tracking number will
appear on the customers order receipts. All e-mails to the customer can be configured
under Content > Email Templates. |
|
3 |
Some shipping carriers offer “Suggested Packages” or suggestions on how you should
ship the items ordered. |
|
4 |
Allows you to easily set the “order status”. Use the arrow links to navigate through
all order statuses.
|
|
5 |
This button will actually ship the items and update the status of the order to “shipped”.
|
|
6 |
This section displays all packages shipped for the order. You can delete the package
and create new ones if needed.
|
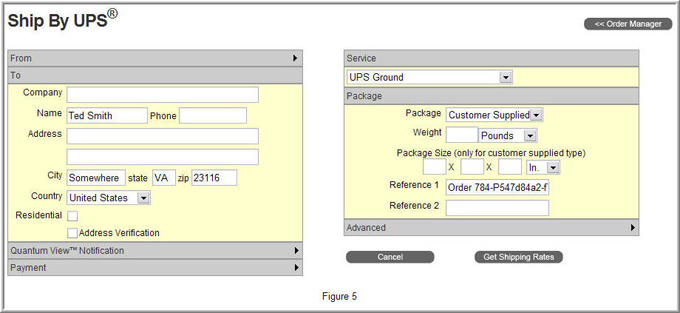
Much like UPS WorldShip ®, this screen allows you to ship a package, have your account
billed, and print off a shipping label.
You can also obtain a rate quote by selecting the “Get Rates” button at the bottom
of the screen.
Keep in mind the “Quantum View Notification”, “Payment”, and “Advanced” sections
must be opened by clicking the header in which they appear. This will expand the
menu further.
Printing a Order
An Order can be printed from
the Order Manager screen or from the Order Details page by clicking the “print button”.

Select a print template from the “template” drop down list and click the arrow button
to generate a preview.
Print templates can be configured under Content > Print Templates.